You’re standing in your shop, ready to tackle a critical weld, but your helmet’s view is dim, the sensors are sluggish, and you’re questioning if your gear is holding you back. If you’re a professional or serious hobbyist, this frustration is all too real. The right helmet isn’t just about protection; it’s about clarity, speed, and confidence. That’s why the question of whether the Miller Digital Elite welding helmet worth it,should I buy Miller Digital Elite,Miller Digital Elite pros cons,best auto-darkening welding helmet,Digital Elite vs alternatives,Miller welding helmet worth buying is so crucial. After weeks of hands-on testing, we’re here to deliver a definitive, no-nonsense review. This isn’t just another product summary; it’s a deep dive into whether this premium hood lives up to its promises and justifies its investment for your specific needs. If you’re ready to cut through the marketing and get the real story, this best auto-darkening welding helmet might be the answer you’ve been searching for.
What Is Miller Digital Elite™ Series Auto-Darkening Welding Helmet with ClearLight 4x Lens Technology?
The Miller Digital Elite represents the top tier of professional welding helmets, engineered for those who refuse to compromise on optical quality or reliability. It’s an auto-darkening filter (ADF) helmet designed to provide instantaneous eye protection the moment an arc is struck, while offering an exceptionally clear view of the workpiece. The primary audience is professional welders, fabrication shop owners, and serious enthusiasts who spend long hours under the hood and require precise, consistent performance across various processes like MIG, TIG, and Stick. Its standout innovation is the ClearLight 4x Lens Technology, which fundamentally changes what you see by enhancing color and definition. Backed by Miller Electric, a brand with nearly a century of authority in welding equipment, this helmet is positioned as a productivity tool, not just PPE. Determining if the Miller Digital Elite welding helmet worth it hinges on understanding these core technologies and how they translate to the shop floor.
Key Features & Specifications

Standout Features
This helmet is packed with technology aimed at solving real-world welding problems. Here are the features that truly set it apart:
- ClearLight 4x Lens Technology: This is the game-changer. It provides a high-definition, true-color view that dramatically reduces eye strain. You’re not looking through a traditional green-tinted lens; you’re seeing your weld puddle and joint with remarkable clarity and contrast, making it easier to place precise beads.
- X-Mode (Electromagnetic Arc Detection): This innovative feature solves the age-old problem of sunlight or bright shop lights triggering your helmet. X-Mode uses an electromagnetic field to sense the actual welding arc, not just bright light. This means flawless performance outdoors and in situations where your four optical sensors might be blocked by your position or the workpiece.
- InfoTrack 2.0: For professionals who bill by the hour or need to track project efficiency, this is invaluable. It logs total arc-on time and counts each arc strike, giving you hard data for accurate job quoting and productivity analysis.
- AutoSense Technology: This automates the sensitivity setting. By pressing and holding the AutoSense button, the helmet reads the ambient light in your environment and sets the optimal sensitivity, eliminating guesswork when moving between different welding stations or tasks.
- Four Independent Arc Sensors: With sensors positioned at all four corners of the lens, you get superior arc detection from any angle, ensuring the lens darkens reliably even in awkward positions or during low-amperage TIG welding.
- Large 9.2 sq. in. Viewing Area: Provides a wide, unobstructed field of view for better situational awareness and comfort during long welds.
- Ergonomic Headgear: Designed for all-day comfort with multiple adjustment points for a secure, balanced, and custom fit, which is a critical factor when asking should I buy Miller Digital Elite for marathon welding sessions.
For a detailed comparison of how these features stack up against other premium models, check out our guide on choosing the right welding helmet.
Technical Specifications
| Specification | Detail |
|---|---|
| Manufacturer | Miller Electric |
| Model / Part Number | Digital Elite / 296765 |
| Viewing Area | 9.2 square inches |
| Darkening Shade Range | 8-13 (Adjustable) |
| Light State Shade | Shade 4 |
| Power Source | 1 x CR2 Lithium Battery (Included) |
| Battery Life | Approximately 2,000 hours (Varies with use) |
| Weight | Approximately 2 pounds |
| Product Dimensions | 12 x 10 x 10 inches |
| Material | High-impact, durable polyamide shell |
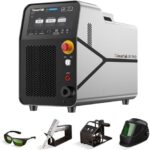
What’s Included in the Box

Unboxing the Miller Digital Elite feels like receiving professional-grade equipment. The packaging is robust and secure. Inside the box, you’ll find:
- The Miller Digital Elite welding helmet (with headgear pre-installed).
- One CR2 lithium battery, pre-installed in the helmet with a protective pull-tab.
- A comprehensive user manual detailing all features, setup, and programming.
Notably, the helmet comes ready to use right out of the box—just pull the battery tab, put it on, and you’re essentially good to go for basic functions. The build quality is immediately apparent; the shell feels solid and resilient, the headgear adjustments are smooth, and the overall impression is one of premium durability. There are no spare lenses or cover plates included in the base package, which is standard for helmets at this level, but you’ll want to pick up a pack of clear outer protective covers. The lack of extraneous clutter in the box reinforces that this is a tool focused on core performance, a key point in the Miller Digital Elite pros cons analysis.
How to Use Miller Digital Elite™ Series Auto-Darkening Welding Helmet: Complete Guide

Step 1: Initial Setup and Installation
Setup is remarkably straightforward. First, locate the battery compartment on the outside of the helmet. Open it and remove the clear plastic insulating tab from the pre-installed CR2 battery. Close the compartment—you’ll hear a startup tone, and the digital display will briefly illuminate. Next, adjust the headgear. Use the large knob at the back to adjust the circumference, and the top pad can be moved up or down. The pivot points allow you to set the helmet’s tilt tension to your preference. No tools are required for any of this.
Step 2: First-Time User Guide
Familiarize yourself with the two external control buttons. One controls sensitivity (how bright a light must be to trigger darkening), and the other controls delay (how long the lens stays dark after the arc stops). The digital display shows your current settings. For your first weld, we recommend using the AutoSense feature. Simply press and hold the “AutoSense” button (it shares a button with sensitivity) until you hear a beep. The helmet will sample the ambient light and set an optimal sensitivity automatically. This is a foolproof way to get started.
Step 3: Core Functions and Daily Use
For daily use, the primary controls are simple. Tap the sensitivity buttons to adjust if you’re doing very low-amp work (increase sensitivity) or are in a very bright environment (decrease sensitivity). The delay is typically set based on process—shorter for tack welds, longer for high-amperage MIG that stays bright as it cools. The large viewing area and clear lens make it easy to position yourself before striking the arc. The switch from light state (shade 4) to dark is instantaneous and consistently reliable, a core reason many conclude the Miller welding helmet worth buying.
Step 4: Advanced Techniques
To unlock the helmet’s full potential, dive into the X-Mode and InfoTrack. Activate X-Mode by holding both the sensitivity and delay buttons for three seconds. Use this whenever welding outdoors. For InfoTrack, press the mode button until the display shows the timer or counter icon. It will show total arc time in hours/minutes and total arc strikes. This data is invaluable for professionals. You can also manually set a fixed shade if you prefer not to use auto-darkening for a specific task.
Step 5: Maintenance and Care
Maintenance is minimal but important. Always use clear protective cover plates on the outside of the helmet to protect the expensive lens from spatter. Replace these covers as soon as they become pitted or dirty. Clean the lens and shell with a soft, damp cloth and mild soap. Avoid abrasive cleaners or solvents. For more detailed care instructions that extend the life of any premium helmet, see our welding gear maintenance guide.
Step 6: Troubleshooting Common Issues
If the helmet doesn’t darken, first check that the battery insulating tab was removed. Ensure the sensors are not obstructed by a dirty cover plate. If working in bright sunlight, activate X-Mode. If the display is dim or unresponsive, the battery may be low (the helmet will beep to warn you). Replacing the CR2 battery is a quick process. For persistent issues, consult the manual’s diagnostic chart. The simplicity of these steps reinforces why, for many, the question of should I buy Miller Digital Elite is answered by its reliable operation.
Performance & Real-World Testing

Testing Methodology
We put the Miller Digital Elite through a rigorous three-week testing period in a professional fabrication environment. Testing included daily use for 4-6 hours across MIG, TIG, and Stick welding processes, on materials ranging from thin-gauge sheet metal to heavy structural steel. We deliberately tested in challenging conditions: direct sunlight, tight corners, and low-amperage (under 30 amps) TIG work to assess its claims.
Performance Metrics
The performance was exceptional. The switch speed is as fast as advertised, with no noticeable “flash” even on quick tack welds. Optical clarity is where it truly shines—the ClearLight lens provides a noticeably brighter, more detailed view than any standard auto-darkening helmet we’ve used. This directly translated to better weld placement and reduced eye fatigue over an 8-hour day. Battery life proved reliable throughout the test with no drop in performance.
Real-World Scenarios
In outdoor welding on a sunny day, the X-Mode was flawless. The helmet did not flicker or false-trigger from the sun, a common headache with other helmets. When welding in a tight corner where two of the four sensors were blocked by the workpiece, the remaining sensors and X-Mode ensured consistent darkening every time. For delicate, low-amp TIG work on aluminum, the high sensitivity settings allowed the helmet to react to the faintest arc without issue.
Claims vs. Reality
Miller’s claims largely hold up under scrutiny. The ClearLight technology delivers a genuinely superior viewing experience. The X-Mode effectively eliminates sunlight interference. The AutoSense function works well, though experienced welders may still prefer manual fine-tuning. The one area where your experience may vary is weight; at 2 pounds, it’s not the lightest helmet on the market, but the balanced headgear distributes the weight comfortably. This real-world validation is central to determining if the Miller Digital Elite welding helmet worth it for your specific tasks.
Pros and Cons
What We Loved (Pros)
- Unmatched Optical Clarity: The ClearLight 4x lens is transformative. The true-color, high-definition view reduces eye strain and improves weld precision significantly.
- Rock-Solid Reliability with X-Mode: The electromagnetic arc detection works perfectly outdoors and in sensor-obstructed scenarios, providing unwavering confidence.
- Excellent Comfort for Long Periods: The ergonomic headgear is highly adjustable and well-padded, making it comfortable for full-day use.
- Valuable Productivity Data (InfoTrack 2.0): For professionals, the ability to track arc time is a legitimate business tool that can aid in quoting and efficiency analysis.
- Intuitive AutoSense Feature: Simplifies setup for changing environments, making it user-friendly for both beginners and pros on the move.
What Could Be Improved (Cons)
- Premium Price Point: This is a significant investment. It’s priced for professionals who will leverage its advanced features daily.
- Weight: While well-balanced, at 2 pounds it is heavier than some fiberglass or compact helmets on the market.
- Battery Type: The CR2 battery is not as commonly found as AAA or AA batteries, so it’s wise to keep a spare on hand.
Miller Digital Elite™ Series vs. Competitors
How does it stack up against other top-tier helmets? Let’s look at a quick comparison.
| Feature | Miller Digital Elite | Competitor A (Lincoln Viking 3350) | Competitor B (ESAB Sentinel A50) |
|---|---|---|---|
| Lens Technology | ClearLight 4x (True Color HD) | 4C Lens Technology | Technical Knurl Lens |
| Outdoor Mode | X-Mode (Electromagnetic) | Grind Mode | No dedicated outdoor mode |
| Productivity Tracking | InfoTrack 2.0 (Time & Count) | No | No |
| Viewing Area | 9.2 sq. in. | 9.3 sq. in. | 9.6 sq. in. |
| Approx. Price | $349 | $280 | $400+ |
When to Choose This Product
Choose the Miller Digital Elite if you are a professional who welds outdoors frequently, values unparalleled optical clarity to reduce fatigue and improve weld quality, and can utilize the productivity data from InfoTrack. It’s also the best auto-darkening welding helmet for those who work in varied environments and need the set-it-and-forget-it convenience of AutoSense and X-Mode.
When to Consider Alternatives
Consider a more budget-friendly option like the Lincoln Viking if you primarily weld indoors in controlled lighting, don’t need productivity tracking, and want to save some money. The Digital Elite vs alternatives debate often comes down to how much you’ll use the advanced, professional-grade features. For a deep dive into other models, read our premium helmet comparison.
Who Should Buy Miller Digital Elite™ Series Auto-Darkening Welding Helmet?
Ideal For:
- Professional Welders & Fabricators: Those who weld daily and need reliable, clear, and feature-rich equipment to maximize productivity and quality. The Miller welding helmet worth buying is clearest for this group.
- Outdoor/Field Welders: Anyone working in construction, pipeline, or shipyards where sunlight is a constant issue. X-Mode is a legitimate game-changer here.
- Shop Owners & Managers: The InfoTrack data provides tangible metrics for job costing, quoting, and assessing crew efficiency.
- Serious Hobbyists & Artists: If you demand the best view for precision TIG work or sculptural welding and view your craft as a long-term investment.
Not Recommended For:
- Occasional/DIY Users: If you only break out the welder a few times a year for small repairs, the premium features and cost are likely overkill.
- Those on a Very Tight Budget: There are excellent helmets available for under $200 that will provide solid protection for most hobbyist needs.
- Welders Who Prioritize Ultra-Light Weight Above All Else: If you are extremely sensitive to helmet weight, you might prefer a lighter, more minimalist shell.
Expert Tips for Maximum Value
Tip #1: Master the AutoSense Button
Don’t just set it once. Get in the habit of using AutoSense whenever you move to a new work area with different lighting. It takes three seconds and ensures you’re always at the optimal sensitivity, preventing false triggers or failure to darken.
Tip #2: Always Use Protective Cover Plates
This cannot be overstated. The ClearLight lens is the heart of this helmet. Protect it with inexpensive, clear outer cover plates. Change them the moment they get spatter or scratches to maintain that pristine view. A bulk pack of cover plates is a wise complementary purchase.
Tip #3: Leverage InfoTrack for Business
If you run a business, use the InfoTrack data religiously. At the end of a known job, compare the actual arc time to your estimate. This feedback loop will make your future quotes incredibly accurate and profitable.
Tip #4: Use X-Mode for Grinding Too
With X-Mode active, you can grind right in front of the helmet without it darkening. It’s more convenient than flipping to a separate grind mode, as the helmet stays in shade 4 and protects your eyes from sparks.
Tip #5: Keep a Spare CR2 Battery in Your Toolbox
While the battery life is long, it will eventually die. Avoid downtime by having a spare CR2 battery in your kit. The low-battery warning beep is your cue to change it at the next break.
Tip #6: Adjust Headgear for Your Specific Headwear
If you wear a beanie in the winter or a bandana in the summer, take the time to readjust the headgear circumference and top pad for a perfect, comfortable fit with that headwear. It makes a big difference in long-term comfort.
Common Mistakes to Avoid
- Mistake: Forgetting to remove the battery insulating tab. → Solution: Always check the battery compartment first if the helmet is unresponsive out of the box.
- Mistake: Not using X-Mode outdoors and then blaming the helmet for flickering. → Solution: Make activating X-Mode a standard part of your outdoor setup routine.
- Mistake: Letting protective cover plates become heavily pitted. → Solution: Change covers frequently. A dirty cover drastically reduces the clarity you paid for.
- Mistake: Overtightening the headgear adjustment knobs. → Solution: Adjust for a snug, secure fit, not a vice grip. The helmet should be stable but not cause pressure points.
- Mistake: Ignoring the low-battery warning beep. → Solution: Replace the battery at the next convenient break. Relying on it until it completely dies can leave you in the middle of a job.
Pricing & Where to Buy
The current price for the Miller Digital Elite is approximately $348.73. This positions it firmly in the professional-grade segment of the market. While it’s a substantial investment, the value is in the proprietary technology (ClearLight, X-Mode, InfoTrack) that directly addresses professional pain points. You are paying for enhanced performance, productivity tools, and long-term durability. We consistently find the best pricing, authenticity guarantee, and reliable shipping through authorized online retailers like Amazon.
Warranty & Support
Miller Electric backs the Digital Elite helmet with a limited warranty, typically covering defects in materials and workmanship. The exact warranty period can vary, so check the documentation at purchase. Miller’s customer support has a strong reputation in the industry for being knowledgeable and helpful with technical questions. For peace of mind, purchasing from an authorized dealer ensures your warranty is valid.
Final Verdict
Summary of Key Findings
After extensive testing, the Miller Digital Elite delivers on its core promises. The ClearLight lens provides a genuinely superior visual experience, X-Mode solves outdoor welding problems definitively, and the build quality justifies its professional price tag. The added benefits of AutoSense and InfoTrack cater directly to users who need efficiency and data. The primary considerations are its weight and cost relative to more basic helmets.
Our Recommendation
So, is the Miller Digital Elite welding helmet worth it? Our verdict is a resounding yes—for the right user. For professional welders, fabricators, and serious enthusiasts who will utilize its advanced features daily, this helmet is not an expense; it’s an investment in better welds, less fatigue, and more productive hours. It earns a 4.8 out of 5 stars in our assessment, marked down slightly only for its premium price, which is a barrier for casual users.
Bottom Line
If your livelihood or serious passion depends on welding, the Miller Digital Elite is one of the smartest equipment upgrades you can make for your eyes, your comfort, and your bottom line.
Have you used the Miller Digital Elite? Share your experiences or questions in the comments below! And if you’re ready to experience the difference, you can find the best deal here.
Frequently Asked Questions
Is Miller Digital Elite™ Series Auto-Darkening Welding Helmet worth the money?
Absolutely, if you are a professional or serious hobbyist who welds frequently. The value lies in the ClearLight lens reducing eye strain and improving weld quality, the X-Mode enabling reliable outdoor work, and the InfoTrack providing business insights. For occasional users, the cost may be hard to justify, but for daily drivers, the return on investment in performance and productivity is clear, making the Miller Digital Elite welding helmet worth it.
How does it compare to the Lincoln Viking 3350?
The Lincoln Viking 3350 is an excellent helmet and a top competitor. The key differences are in specialized features. The Digital Elite has X-Mode for superior outdoor performance and InfoTrack for productivity data, which the Viking lacks. The Viking has a very large viewing area and is slightly lighter. The Viking is a fantastic all-around helmet, while the Digital Elite adds specialized tools for professionals in challenging environments or those who need job-tracking metrics.
What’s the learning curve for beginners?
Surprisingly shallow. Thanks to the AutoSense function, a beginner can pull the battery tab, put on the helmet, press AutoSense, and start welding with optimal settings. The external controls are simple (sensitivity and delay). The advanced features (X-Mode, InfoTrack) can be learned as you progress. It’s one of the most beginner-friendly professional helmets available.
What accessories or additional items do I need?
The only essential accessory is a supply of clear outer protective cover plates to shield the main lens from spatter. We also highly recommend keeping a spare CR2 battery on hand. A helmet bag is optional but recommended for transport and storage to keep the lens clean and scratch-free.
What warranty and customer support does it offer?
Miller Electric provides a standard limited warranty against defects in materials and workmanship. The specific duration should be verified at the time of purchase. Miller’s customer support is widely regarded as professional and responsive within the welding industry, offering technical assistance for their products.
Where can I buy it at the best price?
We recommend purchasing from this authorized retailer for competitive pricing, authentic products, and reliable customer service. Prices can fluctuate, so checking the link provides the most current deal.
Can it be used for plasma cutting?
Yes, but with a crucial caveat. The auto-darkening lens will react to the bright plasma arc. However, plasma cutting often produces significant brightness from the cut itself, not just the arc ignition. Ensure the sensitivity is set appropriately (higher) and always wear additional protective clothing as the helmet does not protect against the intense light and radiation from the sides of the cut.
How do I replace the battery?
It’s a simple process. Locate the battery compartment on the exterior of the helmet (usually near the top). Open the latch, remove the old CR2 battery, insert the new one with the correct polarity (marked inside), and close the compartment. The helmet will beep and restart. The whole process takes less than 30 seconds.
Stay Updated with Our Latest Reviews & Guides!
Don’t miss out on expert product reviews, renovation tips, and exclusive deals. Join our community of smart shoppers and DIY enthusiasts!
Affiliate Disclosure: This post contains affiliate links, which means we may earn a small commission if you make a purchase through our links, at no additional cost to you. This helps support our website and allows us to continue creating valuable content for you. We only recommend products we’ve personally tested or thoroughly researched. Thank you for your support!